Showing posts with label linux. Show all posts

Monday, 10 November 2014

Android Booting Process explained step by step

Android Boot Process is more or less similar to linux booting process. We all know that android is a application running on the top of Linux operating system. More popularly known as " A Stack Of Application"  

Well talking about the various stages in Android Booting , first few steps below are steps of linux booting

Stages Of Booting
  • Bootloader normally the Grub
  • U-Boot or secondary Bootloader or second level Bootloader
  • linux kernel 
  • Android


The Android process has the following sequence
  • Init
  • Zygote
  • System Server
  • Service Manager
  • Other Daemons and processes
  • Applications
BOOTLOADER:
Bootloader is the initial piece of code stored in ROM which has address of the device ( the Boot Media ) from where it should start boot. For example we can boot an operating system from SD-Card , eMMC , SATA , HARDISK , CD-ROM , Network etc. So this Bootloader has the address of the boot media. Since ROM is a non-volatile device bootloader is stored in ROM. we can fuse the ROM to boot from various device. 

U-BOOT:

U-Boot is a second level bootloader which initializes DRAM and other peripheral devices like UART RTC etc. More specifically U-Boot is responsible for loading ramdisk image. Ramdisk image is nothing but the board specific images which initialize certain major peripherals which are necessary to debug the device in case of any emergency.

KERNEL:
Linux kernel is the heart of the Android responsible for the process creation, inter process communication, device drivers, file system management etc. Android applies a custom patch on the main stream kernel to support certain features like Wake locks etc needed for operation of the Android.
The kernel can be either loaded as uncompressed image or as a compressed image. Up on loading, it mounts the root file system (typically passed as kernel command line arguments) and starts the first application in user space.

ANDROID:
The android applications are executed over a Virtual Machine called the Dalvik. Android typically operates wholly on the user space. Now Google has replaced DVM ( The Dalvik Virtual Machine ) with ART ( Android Run Time).

More explanation regarding the boot stages after the zygote Initialization ( The Android Process ) will be explained in the next POST !!!!!


 G HARI PRASATH
Project Engineer


Friday, 15 August 2014

ANDROID ARCHITECTURE


Hai every one!!! Where ever you refer for Android Architecture people use to explain the various stacks in android architecture as Google usually refers to the Android OS as a software stack. I am just showing what i have gathered from other websites which is clearly explaining how Android Architecture is. Each layer of the stack groups together several programs that support specific operating system functions. The image shown below is the architecture of Android.


THE KERNEL:

The base of the stack is the kernel. Google used the Linux version 2.6 OS to build Android's kernel, which includes Android's memory management programs, security settings, power management software and several hardware drivers. Drivers are programs that control hardware devices. For example, the Nexus One has a camera. The Android kernel includes a camera driver, which allows the user to send commands to the camera hardware.

LIBRARIES:

On top of Linux kernel there is a set of libraries including open-source Web browser engine WebKit, well known library libc, SQLite database which is a useful repository for storage and sharing of application data, libraries to play and record audio and video, SSL libraries responsible for Internet security etc.. You can think of libraries as a set of instructions that tell the device how to handle different kinds of data. For example, the media framework library supports playback and recording of various audio, video and picture formats. Other libraries include a three-dimensional acceleration library (for devices with accelerometers) and a Web browser library.

DALVIK VIRTUAL MACHINE / ANDROID RUN TIME:

Located on the same level as the libraries layer, the Android run time layer includes a set of core Java libraries. Android application programmers build their apps using the Java programming language. It also includes the Dalvik Virtual Machine. Google is now replacing Dalvik Virtual Machine With Android Run Time which introduces Ahead-Of-time compilation, which can improve app performance . ART also has tighter install -time verification than Dalvik.

NOTE : I will explain about the difference between Android Run Time and Dalvik virtual Machine in the next post.

A virtual machine is a software application that behaves as if it were an independent device with its own operating system. You can run a virtual machine on a computer that operates on a completely different OS than the physical machine's OS. The Android OS uses virtual machines to run each application as its own process. That's important for a few reasons. First, no application is dependent upon another. Second, if an application crashes, it shouldn't affect any other applications running on the device. Third, it simplifies memory management.

APPLICATION FRAMEWORK:

The next layer is the application framework. This includes the programs that manage the phone's basic functions like resource allocation, telephone applications, switching between processes or programs and keeping track of the phone's physical location. Application developers have full access to Android's application framework. This allows them to take advantage of Android's processing capabilities and support features when building an Android application. Think of the application framework as a set of basic tools with which a developer can build much more complex tools.The Application Framework layer provides many higher-level services to applications in the form of Java classes. Application developers are allowed to make use of these services in their applications

APPLICATION LAYER:

At the top of the stack are the applications themselves. This is where you find the basic functions of the device such as making phone calls, accessing the Web browser and accessing your contacts list. If you're an average user, this is the layer you'll use most. You do that with the user interface. Only Google programmers, application developers and hardware manufacturers access the other layers further down the stack. Moreover most of the people are playing over in this layer, coz it is the one which makes Android an ANDROID :P........

Author
HARI PRASATH G
PROJECT ENGINEER

Saturday, 12 July 2014

USB PARTITIONING-Using LINUX Terminal ( Partion your USB like your HardDisk)

HOW TO PARTITION A HARD-DISK AND USB-DRIVE IN LINUX:

The partitioning process is same for both hard-disk and USB.

STEP1:

      Use lsblk command to list all block devices attached to the system.

STEP 2:

       Find the name of the corresponding hard disk or USB drive(ex. SDA or SDB or SDC ).
(Be careful while locating the name because if partitioned wrongly, it may result in loss of data ).

STEP 3:

      Use fdisk Commands to create and view partitions.

      fdisk <path to the hard-disk>

ex.     fdisk /dev/sdb


List of fdisk commands:

      p : print the partition table
      n : create a new partition
      d : delete a partition
      q : exit without saving the changes in partition table
      w : exit with saving
      a : to make a corresponding partition as bootable
      t : to set a corresponding partition as Swap Area

STEP 4:

In order to create a new partition, we must delete the existing partition.
the below diagrams shows creation of new partition and finally writing the partition using W command.


STEP 5:

       After partitioning we need to specify the file format for each partitions.Each Filesystem has its own utility.

List of File Formats:
SCO bfs, CPM, ext2, ext3, ext4, minix, fat (vfat), HFS, VXFS, RF disk, RK disk, DECtape, and NTFS.


For example, assume that we have created four partitions.
If required file format is ext2 in first partition, the utility is mke2fs.

Command:
             mke2fs /dev/sdb1 -L 'NAME_FOR_THIS_PART'


If required file format is ext3 in second partition, we need to create ext2 filesystem first and then change it to ext3 using tune2fs command.

Command:
             mke2fs /dev/sdb2 -L 'NAME_FOR_THIS_PART'
             tune2fs -j /dev/sdb2


If the required file format is FAT in third partition,
then the command is

             mkfs.vfat -n 'NAME_FOR_THIS_PART' -I  /dev/sdb3

Partioned disk can be seen below:


  Meet you in the next Knowledge Sharing Session!!!!!!!


Author
Sandheep Kumar M
Project Engineer
 

Friday, 11 July 2014

ALPINE- Send Message Through LINUX Terminal (UBUNTU)

Hey Every one in the previous post i explained something about SSMTP for sending mail through LINUX terminal.. This post is also about sending mail but then it has some GUI, so that you could use it in a simpler way.....

You Know ALPINE is the easiest and best way to send and read email while you are in Terminal.

STEPS

1.Install alpine

      sudo apt-get install alpine

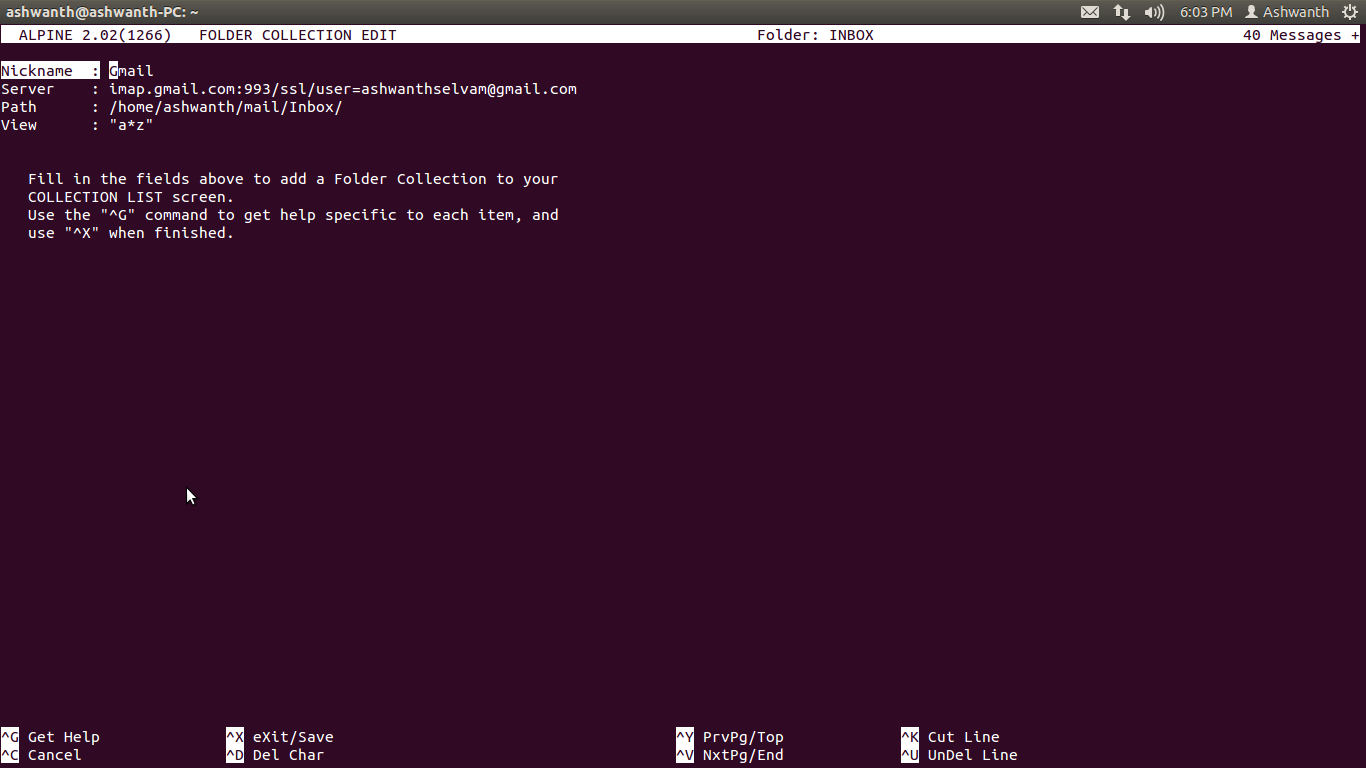
2.From that main screen (M) go to setup (S) > add a new collection (L).Add the name of the collection (Gmail) and imap.gmail.com:993/ssl/user=me@gmail.com in the server box (adding your proper gmail address of course).You can specify path and view or leave it. <ctrl>x to save and exit.


3.Then go back to the main menu and go to setup > config (C) and place all your details in the appropriate boxes, as in the screenshot below, with this time adding also the smtp server (smtp.gmail.com:587/tls/user=me@gmail.com) and specifying your inbox path and personal name.


4.Now save and exit back to the menu. Now with this basic setup you should be able to read and send mail.

Meet you in the next knowledge sharing session :)


Author
Ashwanth Selvam
Project engineer


SSMTP- Send Mail Easily Through LINUX Terminal (UBUNTU)

Hi,Many of the linux users wish to do everything through terminal (i.e) through commands. This tutorial is mainly for them...

Ways of sending mail from terminal:

There are many ways to send mail from terminal
1.Alpine
2.Mailutils
3.SSMTP
4.Mutt
5.Sendemail

But the ssmtp,sendemail etc can only be used for sending emails.

SSMTP:

Sending mail through ssmtp involves the following steps.

1.Install ssmtp
sudo apt-get install ssmtp

2.Next edit the configuration file.(editor of your choice)
sudo gvim /etc/ssmtp/ssmtp.conf

Here the configuration is done for gmail. Configuring outlook is very difficult. You can try your luck. :)

# Config file for SSMTP sendmail
# The person who gets all mail for userids < 1000
# Make this empty to disable rewriting.
root=MyEmailAddress@gmail.com

# The place where the mail goes. The actual machine name is required no
# MX records are consulted. Commonly mailhosts are named mail.domain.com
#mailhub=mail
mailhub=smtp.gmail.com:587

AuthUser=MyEmailAddress@gmail.com
AuthPass=MyPassword
UseTLS=YES
UseSTARTTLS=YES

# Where will the mail seem to come from?
rewriteDomain=gmail.com

# The full hostname
#hostname=MyMediaServer.home
hostname=MyEmailAddress@gmail.com

# Are users allowed to set their own From: address?
# YES - Allow the user to specify their own From: address
# NO - Use the system generated From: address
FromLineOverride=YES

4.After configuring you can send mail as shown below:
   This is the command
ssmtp recipient_email@gmail.com

Then it waits for you to enter


To: myemailaddress@gmail.com
From: myemailaddress@gmail.com
Subject: subject
(space to indicate message)
message
<ctrl>d to finish the message.

HURRAH!! message is sent using SSMTP. Meet you in the next knowledge sharing session :)


Author
Ashwanth Selvam
Project engineer

Wednesday, 9 July 2014

TFTP - TRIVIAL FILE TRANSFER PROTOCOL (Explanation With Diagrams)

What is TFTP???

Trivial File Transfer Protocol (TFTP) is an Internet software utility for transferring files that is simpler to use than the File Transfer Protocol (FTP) but less capable. It is used where user authentication and directory visibility are not required. TFTP uses the User Datagram Protocol (UDP(using port number 69)) rather than the Transmission Control Protocol (TCP).

TFTP only reads and writes files from or to a remote server. It cannot list directories, and has no provisions for user authentication.

Installing & Configuring TFTP:

1.To install sudo apt-get install xinetd tftpd tftp


2.Create a file named tftp in the directory /etc/xinetd.d


3.The contents of the TFTP file should be 
  
service tftp
{
protocol        = udp
port            = 69
socket_type     = dgram
wait            = yes
user            = nobody
server          = /usr/sbin/in.tftpd
server_args     = /home/ashwanth/tftp_folder
disable         = no
}

NOTE: In the server-args mention the directory where you want to receive and send files using tftp


The procedure for creating the directory is 


        sudo mkdir /home/<user-name>/tftp_folder

sudo chmod -R 777 /home/<user-name>/tftp_folder
sudo chown -R nobody /home/<user-name>/tftp_folder

The permissions and ownership should be given to the directory as mentioned above.


4.To start the service the command is sudo service xinetd start

(similarly for stop and restart)

5.Then to start tftp the command is : tftp ipaddress(user you would like to connect)


6.to get a file from the other user's pc enter the command get

eg : tftp>get
     if you give get then it prompts for files
     (files)<your filename>


7.You can use quit or q command to quit.


8.The file obtained using get will be in the directory at which place you have given the command.(eg in Documents if you are in the documents directory)


The tricky part is to put a file.

   
9.First create a file using touch.

eg touch <filename>


10.Then change mode using chmod a+w <filename>


11.To put this file into the user's pc the steps 9 and 10 should be followed and a file of same filename should be created in the user's too in their tftp directory.


12.Then you can use the put command similar to the get command.  


Since the above file was empty it didnt show the sent thing ..

The new.file is a file that i have already created now you can see the difference..


AUTHOR
Ashwanth Selvam
Project Engineer


Tuesday, 8 July 2014

FILE TRANSFER PROTOCOL- LINUX TERMINAL (Explanation With Diagrams)

FTP(File Transfer Protocol):

-> FTP is a client-server protocol.
-> FTP requires the client to enter plaintext password to access the server.
-> FTP uses SSH protocol for password verification and user authentication.
-> One system acts as client and other acts as server.
-> The server can regulate the access of its contents to several users.
-> FTP operates in two modes.
      *Active
      *Passive
-> In Active mode, two ports are used.
      Ex. If client connects to a port N, it can listen to the server response from port(N+1)
-> In Passive mode, only one port is used.

Default Location of FTP directory in Server Computer:
           
                  /srv/ftp

Default Location of FTP configuration settings:

                  /etc

and the file name is vsftpd.conf

STEP 1:

In the vsftpd.conf file,(figure :1)


figure :1

Edit the following basic things:(figure:2) --> Enable Anonymous (anonymous_enable=yes)
--> Enable Write-Enable (write_enable=yes)
--> To allow local users, Enable local users(local_users=yes)


figure :2

STEP 2:

Restart the FTP process by using the following Command
           
                  sudo service vsftpd restart

STEP 3: Enter into FTP by typing the following Command(figure:3)
      
                  ftp<hostname> or ftp<IP-Address of the server>


figure :3

STEP 4:
Enter user name and password.(figure :4)


(figure :4)

STEP 5:
After correct Authentication, use GET and PUT commands to move files from server to client and vice-versa.

GET:  Server--->Client
PUT:  Server<---Client

GET:(figure :5)
$get
(local-file)<path to the local file>
(remote-file)<path to the remote file>


(figure :5)

PUT:(figure :6)
$put
(local-file)<path to the local file>
(remote-file)<path to the remote file>

(figure :6)


Additional Information:
-> The server system can restrict the access of the client users within the root directories using chroot enable option within vsftpd.conf file.
                                                                                                                                             Author
Sandheep Kumar
Project Engineer