Showing posts with label android. Show all posts

Friday, 12 February 2016

Embedded Android

                              Having plans to create a device that would change this world ? Are you an embedded programmer skilled in doing some stuffs with micro-controller kits. Time to move on to next level. Next generation arm  based embedded processor kits have arrived. These have already been introduced to run on operating systems like Windows CE, linux, android and more on.

Features of using micro-processors over micro-controllers:

* Connectivity: 

Today, each and every embedded device present before us are connected with each other to form an network. This would be a norm in future which your device must imply with. Connectivity might be either through Wifi, Bluetooth or Ethernet. To add this support to a standalone microcontroller kit would be tiresome. This is the main feature where embedded processors come into play, where the SoC Chip manufacturer handles this for you. These processors are placed on the development board that contains on board Wifi/BT combo chips and come with an Ethernet port. On the Software side, many source operating systems like embedded linux, embedded android are available which provide us with a reliable stack on top of which our applications need to developed. Hence most of our board-bringup and assembling is done by SoC vendors itself. With considerable efforts reduced, our role would be narrowed in developing the application.

* Display :

It would be weird these days if your product comes with a LED/LCD Display to display some text. User Interface [UI] has already been influential because at the end of the day, the user's decision is going to decide the fate of the product. High Resolution Display panels with Resistive/Capacitive Touch Screen would absolutely overthrow its LCD/LED counterparts in this era. These embedded development kits have provisions for connecting several kind of displays ranging from 3" inch to 10" inch. To be noted, they have HDMI ports too which provides rich color resolutions.

* Multimedia :

Have you ever tried to add Audio support for your controller kit?. With these embedded development kits, It is much easier to play audio and video files. Moreover, each kit comes with its own graphical processing unit[GPU] which provides immense gaming performance. To believe it, you need to experience it by playing gaming apps on a development kit running on Android. We prefer Ashphalt !!!!!!

* Storage :

Each embedded processor has its own internal storage in the form of flash[eMMC], whose size from 1GB to 16GB. Hence Data Storage must not be a problem.

* Hardware Interfaces:

Today, Embedded processors come with different interfaces which are not available in conventional microcontroller kits. They include
# USB
# PCI
# SATA

Each of the above interface has its own use case and in turn can provide varied functionalities.

* Camera :

Do you want your device to be bit more realistic manipulating some real time data. Then your device needs to have a camera. These kits have provision for those too.

Myths:

* Power Consumption:

Obviously, microcontrollers outplay these kits in terms of power consumption. But recent technological developments have shed some light onto that area. This might range from advanced suspend/resume operations to low power consuming ARM Cores.Soon this gap would be narrowed down. In the future, you can expect devices that consume almost little amount of energy.

* Complexity of Operating Systems:

Real Time Operating systems tend to be more complex from a developer point of view. But in reality, you have got more advantages than disadvantages. Nowadays, several Developer communities are available which openly offer support to any kind of problems faced while developing a device.

* Cost :

Embedded Development kits actually tend to be cost-effective because they provide end-to-end solution for making device. It is really good to see low cost development kits to hit the market. Front runners among them are Raspberry Pi and Snapdragon Board.

The continuation of these posts mainly target embedded developers who are aspiring to bring out some new innovation to this world like us. To begin with, we recommend you with the following kits.


  •  Freescale imx6 based processors.
  •  Wandboard Solo,Dual or Quad.
  •  Nitrogen 6x Kits
  •  UDOO imx6 kits.
  •  Ankaa Development Kit 
  •  Raspberry Pi
  •  Qualcomm Snapdragon


Regarding the Operating system, we prefer "Embedded Android". To know why, wait for the next post..

Thursday, 4 February 2016

Internet Of Things - Beginners Learning - Part 2 - The MQTT

Hey Guys, In the previous post I just gave an overview about IoT and its Development Tools. Let us narrow down the discussion to a simple MQTT Sub-Pub mechanism.

An MQTT protocol is similar to a Google Alerts mechanism where you go to google alerts page and you subscribe for a topic and the message is delivered whenever there is any information on the topic you have subscribed.

Fine !! sound and clear I hope. 

First of all to work with MQTT you need three hardware components in the MQTT verbose it is 

  1. Broker
  2. Publisher
  3. Subscriber
Let us take facebook as an example and understand this concept.
  1. Broker - Facebook server
  2. Publisher - Is your Crush in facebook. 
  3. Subscriber - Is you
Still creepy !!? Lemme explain Let us say you want to know all the activities of your crush in facebook like their like, post, tags etc. what you will do? you just visit their profile and mark them as your favorites. Ultimately the facebook server sends you the notification on your phone whenever your crush do any post or likes some one photos.

Here you have subscribed for your crush activities and the facebook server, the broker is sending the data whenever your  crush does any activities . Simple right ? that is MQTT

Who can be the publisher, the broker ,the subscriber?
Well anyone who is capable of holding huge number of requests can be a broker 
Apart from this any device which can be both subscriber and publisher of data.

The image below will clearly explain 


  1. The shoe will tell you how much kilometers you have covered by foot.
  2. The light may tell you how much electricity it has consumed.
  3. The Temperature sensor might tell you when to switch of the AC or it might take control of the AC or whatever.
  4. Your delivery truck may send you timely updates on its position.
  5. Your wrist band may tell you how fast your hear beats. or you can set alarm in a wristband so when the correct time ticks in your phone it sends the message to wrist band to vibrate. 

Cool to hear Right !!!??  

I will explain you how to start programming these devices from my next post.... 

Think Iot!!!!!!!!!!!!!


Sunday, 17 January 2016

Internet of Things - Beginners learning Part - I


Salut les gens !!!, Its been a long time since the last post.

Hope every one are updated with the latest tech. Well this time I am going to publish a series of post regarding the so called buzz INTERNET OF THINGS. I am not going to screw you by saying the definition that, by this time you could have seen at least in 1000 places. Though the concept of connected device exists now the techno geeks are boosting the concept with the new name IoT.

Fine !!, lemme start with a very small classification on various hardware and software platform to implement IoT and then begin with my methods, assuming that you know what is IoT bla bla !!!!
I came across the following tools across various platforms

IoT Development Tools:

Development Tool here I mean is IDE, basically.
  1. Arduino
  2. Eclipse IOT -  Mihini , Koneki and paho
  3. Node - RED

IoT Hardware:

The device which can be used to plan a IoT architecture

  1. Arduino - the development board
  2. Beagle Board
  3. Raspberry PI

IoT OS:

Basically I am not going to restrict you to use a particular Operating System, coz that could contradict the use of IoT . Any OS can be used. But to be more specific
  1. Raspbian
  2. Alljoyn
  3. Android
  4. Linux and its distribution
  5. Windows
  6. Macintosh
and the list goes on.....

Apart from this we have many other platform to work with.

This series of post is going to be with Arduino, Raspberry, Raspbian, Linux and stuffs

Stay tuned for Part II we shall start with implementing the subscriber and publisher code. 
Subscriber????? Publisher??? looking alien for beginners ??? Stay tuned!!!


Friday, 8 May 2015

Java native programming in Android

Are you a C maniac ? But then less knowledge in java .
1) How to write your own Android application with all your C /C++ implementation
2) Having a good project in C ? Want to convert to an Android application ?

All your answer is JNI

Yes android helps you to implement all your functions in C and aids you in implementing your algorithms in android application

How to implement?
All you need is NDK .
1) Download the latest NDK  from google developers site.
2) Give the location of NDK in eclipse ( windows / preferences /Android / NDK)
3) Right click your project , android tools , then click Add native support

A jni folder will be created in the android which will be your source folder for writing C implementation

Monday, 10 November 2014

Android Booting Process explained step by step

Android Boot Process is more or less similar to linux booting process. We all know that android is a application running on the top of Linux operating system. More popularly known as " A Stack Of Application"  

Well talking about the various stages in Android Booting , first few steps below are steps of linux booting

Stages Of Booting
  • Bootloader normally the Grub
  • U-Boot or secondary Bootloader or second level Bootloader
  • linux kernel 
  • Android


The Android process has the following sequence
  • Init
  • Zygote
  • System Server
  • Service Manager
  • Other Daemons and processes
  • Applications
BOOTLOADER:
Bootloader is the initial piece of code stored in ROM which has address of the device ( the Boot Media ) from where it should start boot. For example we can boot an operating system from SD-Card , eMMC , SATA , HARDISK , CD-ROM , Network etc. So this Bootloader has the address of the boot media. Since ROM is a non-volatile device bootloader is stored in ROM. we can fuse the ROM to boot from various device. 

U-BOOT:

U-Boot is a second level bootloader which initializes DRAM and other peripheral devices like UART RTC etc. More specifically U-Boot is responsible for loading ramdisk image. Ramdisk image is nothing but the board specific images which initialize certain major peripherals which are necessary to debug the device in case of any emergency.

KERNEL:
Linux kernel is the heart of the Android responsible for the process creation, inter process communication, device drivers, file system management etc. Android applies a custom patch on the main stream kernel to support certain features like Wake locks etc needed for operation of the Android.
The kernel can be either loaded as uncompressed image or as a compressed image. Up on loading, it mounts the root file system (typically passed as kernel command line arguments) and starts the first application in user space.

ANDROID:
The android applications are executed over a Virtual Machine called the Dalvik. Android typically operates wholly on the user space. Now Google has replaced DVM ( The Dalvik Virtual Machine ) with ART ( Android Run Time).

More explanation regarding the boot stages after the zygote Initialization ( The Android Process ) will be explained in the next POST !!!!!


 G HARI PRASATH
Project Engineer


Monday, 25 August 2014

MAKING YOUR APP VISIBLE IN ANDROID GALLERY FOR SHARING

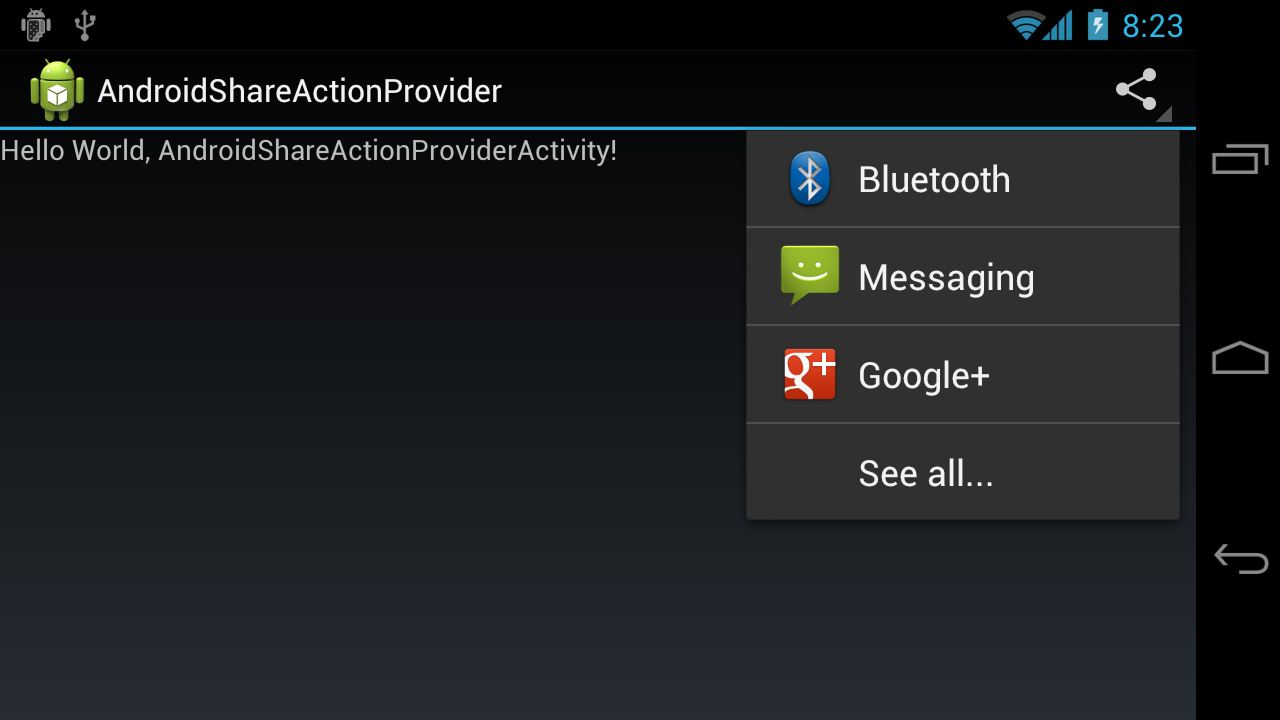
Hi all !!! when you see the Share Icon in Android Gallery it usually displays the application which has the capability to share a message , image, Video, or whatever data it is. How the gallery actually identifies the application which is capable of sharing.


when you dig through the android source code for Gallery you will see a java file named ShareActionprovider.java this file has the tendency to update the menu in Action Bar in gallery which shows the Application.

what actually happens?
                       
                         Whenever the method public void setShareIntent(Intent shareIntent) in ShareActionProvider.java is invoked (the snippet is shown below)

    public void setShareIntent(Intent shareIntent) {
        ActivityChooserModel dataModel = ActivityChooserModel.get(mContext,
            mShareHistoryFileName);
        dataModel.setIntent(shareIntent);
    }


the ActivityChooserModel.setIntent will check for all the apps which is capable of sharing i.e it checks all the AndroidManifest.xml file of the Apps which has set share INTENT more precisely for this TAG,

                  android:name="android.intent.action.SEND" 

if this Action filter is present in the welcome Activity then this app will be shown in the gallery of your device. 


Author
G Hari Prasath
Project Engineer

Saturday, 16 August 2014

share Icon Not Enabled in Android Device- [ Android Bugs ]

Hello developers have you ever faced a problem, that your share icon in gallery or any other place in your android device (say file manager) is not enabled i.e it is not clickable, while porting your own android source in your own device. If so here is the solution for that.


when you move to the packages section of your android source you will find the source code for Gallery2 in your apps directory. 

That is i'm mentioning this spot in your system
Android_source/Packages/apps/Gallery2

In this you will have all the layouts, resources, java codes necessary to execute Gallery2.apk in your System/app directory of your device.

here is what you have to change. Go to res/menu/photo.xml in your Gallery2 directory where you will find this snippet to invoke Share Provider in the Action Bar.

<item android:title="@string/share"
 android:visible="false" 
android:showAsAction="ifRoom
android:icon="@drawable/ic_menu_share_holo_light" 
android:id="@+id/action_share" 
android:actionProviderClass="android.widget.ShareActionProvider" 
android:enabled="true"/>

The Attribute showAsAction is responsible for this. Down below this snippet you will find the snippet for the delete icon where which is given higher priority than share and hence share is not responding since DELETE is given room.

We are going to change showAsAction attribute to "always" so that share is enabled.

Change the above snippet as follows.

<item android:title="@string/share"
 android:visible="false" 
android:showAsAction="always
android:icon="@drawable/ic_menu_share_holo_light" 
android:id="@+id/action_share" 
android:actionProviderClass="android.widget.ShareActionProvider" 
android:enabled="true"/>

Once this is done run the Makefile in the Gallery2 directory. That will produce the output apk file in the directory Android_source/out/target/product/device_name/system/app/Gallery2.apk

transfer this apk file to the system/app directory of your device. 

It will work fine!!!!!!!!!!

Author
Hari Prasath G
Project Engineer


Friday, 15 August 2014

ANDROID ARCHITECTURE


Hai every one!!! Where ever you refer for Android Architecture people use to explain the various stacks in android architecture as Google usually refers to the Android OS as a software stack. I am just showing what i have gathered from other websites which is clearly explaining how Android Architecture is. Each layer of the stack groups together several programs that support specific operating system functions. The image shown below is the architecture of Android.


THE KERNEL:

The base of the stack is the kernel. Google used the Linux version 2.6 OS to build Android's kernel, which includes Android's memory management programs, security settings, power management software and several hardware drivers. Drivers are programs that control hardware devices. For example, the Nexus One has a camera. The Android kernel includes a camera driver, which allows the user to send commands to the camera hardware.

LIBRARIES:

On top of Linux kernel there is a set of libraries including open-source Web browser engine WebKit, well known library libc, SQLite database which is a useful repository for storage and sharing of application data, libraries to play and record audio and video, SSL libraries responsible for Internet security etc.. You can think of libraries as a set of instructions that tell the device how to handle different kinds of data. For example, the media framework library supports playback and recording of various audio, video and picture formats. Other libraries include a three-dimensional acceleration library (for devices with accelerometers) and a Web browser library.

DALVIK VIRTUAL MACHINE / ANDROID RUN TIME:

Located on the same level as the libraries layer, the Android run time layer includes a set of core Java libraries. Android application programmers build their apps using the Java programming language. It also includes the Dalvik Virtual Machine. Google is now replacing Dalvik Virtual Machine With Android Run Time which introduces Ahead-Of-time compilation, which can improve app performance . ART also has tighter install -time verification than Dalvik.

NOTE : I will explain about the difference between Android Run Time and Dalvik virtual Machine in the next post.

A virtual machine is a software application that behaves as if it were an independent device with its own operating system. You can run a virtual machine on a computer that operates on a completely different OS than the physical machine's OS. The Android OS uses virtual machines to run each application as its own process. That's important for a few reasons. First, no application is dependent upon another. Second, if an application crashes, it shouldn't affect any other applications running on the device. Third, it simplifies memory management.

APPLICATION FRAMEWORK:

The next layer is the application framework. This includes the programs that manage the phone's basic functions like resource allocation, telephone applications, switching between processes or programs and keeping track of the phone's physical location. Application developers have full access to Android's application framework. This allows them to take advantage of Android's processing capabilities and support features when building an Android application. Think of the application framework as a set of basic tools with which a developer can build much more complex tools.The Application Framework layer provides many higher-level services to applications in the form of Java classes. Application developers are allowed to make use of these services in their applications

APPLICATION LAYER:

At the top of the stack are the applications themselves. This is where you find the basic functions of the device such as making phone calls, accessing the Web browser and accessing your contacts list. If you're an average user, this is the layer you'll use most. You do that with the user interface. Only Google programmers, application developers and hardware manufacturers access the other layers further down the stack. Moreover most of the people are playing over in this layer, coz it is the one which makes Android an ANDROID :P........

Author
HARI PRASATH G
PROJECT ENGINEER