Interfacing
RTC DS1307 with Atmel AVR Microcontroller
In this tutorial, the steps involved in
interfacing the real time clock chip DS1307 with Atmel AVR microcontroller has
been explained. Before getting into detail,
What is this RTC??
A real-time clock(RTC) basically as the name suggests are clock modules that keeps track of the current time. These RTCs are present in almost any embedded device which needs to keep accurate time. The main advantage of RTC is that they have a battery backup which keeps the clock running even in case of power failure.There are many RTC chips available in the market, but DS1307 is the one most commonly used.
Features of DS1307:
⦁ DS1307 is serial real time clock which is I2C compatible. So before continuing this blog have a quick look at our previous post about I2C Communication to get a clear picture visit our page
⦁ This provides seconds, minutes, hour, day, date, month and year information. The end of the month is automatically adjusted which are fewer than 31 days including leap year.
⦁ The clock inside the chip supports both 24 hr and 12 hr format with AM/PM indicator.
⦁ The chip has an in-built power sense circuit which senses the power failure and switches to battery backup power.
Steps involved in Interfacing RTC with AVR controller:
⦁ The RTC DS1307 has a set of internal time keeping registers which is used to set and read time from them. They also have 58 bytes of non-volatile RAM to store information such as an alarm, event reminder something like that.

Note: As said on the DS1307 datasheet, because the
initial power-on state of this bit is not defined, it is important to clear the
Clock Halt (CH=0) bit in the seconds register(00H).
2) Once
the registers been properly set, we can read the time directly. One important
thing is these registers don’t store the values as binary. Instead it stores all
its values in Binary Coded Decimal (BCD) format. So care should be taken
while writing the time into these registers.
3) As
I have already explained the protocol used in this interface is I2C.
·
RTC DS1307 à
acts as I2C Slave
·
AVR controller à
acts as I2C Master
4) Writing
the time into the Slave’s corresponding registers:

- · In any communication normally there has to be a sender and recipient, and both should have an initial pairing only then the communication will be effective.
- · This initial pairing has to be done by the master by specifying the slave address which it wants to communicate. In our case the slave address for DS1307 is a 7 bit address 1101000.
- · Once the slave address is given, we have to specify whether it is a read/write operation(in our case, Write=0).
- · After getting the ACK, specify the register address from where the write operation has to start.
- · For every ACK, send a data to the slave. It automatically increments the address pointer so there is no need for specifying the register address each time.
5) Reading the time from the Slave’s
corresponding registers:
- · For read operation, when we don’t specify the address pointer from which it has to be read, the data will start reading from the last pointed address which might not be valid.
- · Hence it is advisable to specify the address pointer first before the start of any read operation.
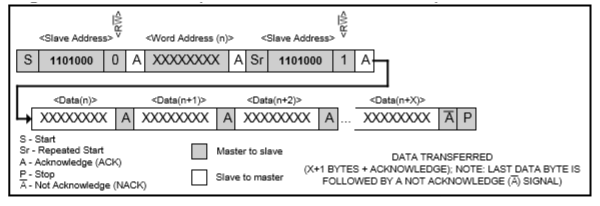
- · This could be done by writing the register address(in write mode) in order to point the address pointer to the location we need and then switching it to read mode(Read=1) by performing the repeated start operation.
- · The process is same as the write operation. One thing to be noted is that the last data has to be negative acknowledged NACK in read mode.
- · That’s all, the interfacing part of RTC is completed now. You can view this real time clock running in your display.
For any doubts either conceptually or in the coding
side, you can contact us at embeddedunderoneroof@gmail.com
Author
Karthik
Embedded Project
Engineer
No comments:
Post a Comment